MP3 Songs on iPhone greyed out; “This song is not currently available in your country or region” error message

iPhone sync has always been a little wonky, but today I discovered this gem. A few audio tracks showed up on my iPhone but were greyed out; tapping them resulted in an “This song is not currently available in your country or region” error message.

What worked for me was to turn off “Sync with this iPhone over Wi-Fi” in iTunes and click the sync button. Lo and behold, the missing mp3 songs were transferred to my iPhone and I can now play them.

This happened on Windows 10, but may apply to Mac OS as well.

I’m using iTunes 12.12.2.2 and an iPhone SE (2020 model) with iOS 15.1.

iPhone: Can’t Enter Recovery Mode

I was just trying to factory reset an old iPhone 6S, following these instructions provided by Apple. However, try as I might, the phone would just reboot.

Turns out my notebook’s USB port I was using to connect the iPhone 6S for doesn’t provide enough voltage and is thus ignored by the iPhone. I think this is so the phone doesn’t risk running out of power while updating.

The solution was to use a powered USB hub.

iOS iTunes Remote can’t find iTunes Library

The iTunes Remote software on my iPad worked flawlessly with my Macbook Air, but not with my Windows PC. I finally decided to investigate why, and after much search and trial-and-error, I found a solution.

It turns out that it gets confused by IPv6 on Windows (interestingly the same is not a problem on my MacBook, so I blame Windows). Once I disabled TCP/IPv6, iTunes remote started working.

To do so, open your Network and Sharing Center from the control panel. It looks like this:

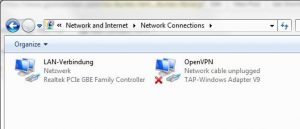
Next, click on “Change adapter settings”, on the left-hand sidebar of that screen. You’ll get a new window, like this:

Now, most likely yours will be in English (Netzwerk = Network; LAN Verbindung = LAN Connection – Don’t ask me why my Windows insists on using some German terms) and the name of your network card will probably differ, but you want the LAN Connection that connects to the same network that your iPad or iPhone connects to. This might be a WLAN, and I suspect most people only have one network connected to their PC.

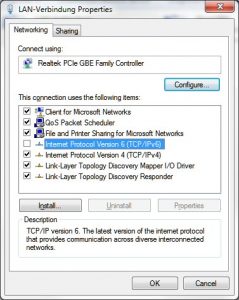
Anyway, right-click on the network card and select “Properties”. You’ll need Administrator rights. A new window pops up:

Simply uncheck the checkbox of the “Internet Protocol Version 6” item. Click OK.

One additional step is required.

Even though windows doesn’t ask you to, I found that I had to restart my PC. After that, my iTunes remote found my iTunes library flawlessly.

I hope this helps. And, no, I don’t know what we can do once TCP/IPv6 becomes indispensable – except for hoping for a fix from Apple and/or Microsoft.

OpenVPN Connect doesn’t work at all on iPad Air / new iPad Mini

Yeah this had me puzzled for a while. Basically, I configured the OpenVPN client correctly (I thought so anyway). When I attempted to connect to my server, both the in-App log window and the log of my server remained empty: From what I could tell, OpenVPN didn’t even try!

Well, it turns out that as of early December 2013, OpenVPN Connect does not work on 64bit architecture on an iPad or an iPhone. The developers expect an update in mid-2013 to fix this. So until then there is nothing that we can do about it. Too bad.

Update: Problem has been fixed in current versions of OpenVPN Connect.

iPhone not recognized by iTunes – Can’t Sync

For a while now I’ve had the issue that, sometimes, my iPhone would not be recognized by iTunes and wouldn’t sync. Sometimes there  was an error message; sometimes not. Most recently, I would just get the Windows’ sound you get when you connect a USB device twice in a row. The iPhone then charged, but did not sync at all.

Last night it got to the point where it just simply did not work at all anymore, so I had to look into it. Much to my surprise, the relevant article on the Apple Support Site, iOS: “Device not recognized in iTunes for Windows”, actually helped. In my case, I had to remove and reinstall the Apple Mobile Device USB driver.

Specifically:

Reinstall the Apple Mobile Device Driver

  1. Right-click the Apple Mobile Device entry in Device Manager and choose Uninstall from the shortcut menu.
  2. When prompted, select the box “Delete the driver software for this device” and click OK.
  3. In the resulting dialog box, click OK.
  4. In the Device Manager window, right-click Universal Serial Bus controllers and choose Scan for hardware changes from the shortcut menu.

At this point, the Apple Mobile Device entry did not reappear. Checking in the “Computer” window – the one which has your drives listed – showed an “Apple iPhone” device. I found it in the Device Manager under “Portable Devices”. I had to then update the software:

  1. Right-click the Apple iPhone, Apple iPad, or Apple iPod entry in Device Manager and choose Update Driver from the shortcut menu.
  2. Click “Browse my computer for driver software.”
  3. Click “Let me pick from a list of device drivers on my computer.”
  4. Click the Have Disk button. (If the Have Disk option is not present, choose a device category such as Mobile Phone or Storage Device if listed, and click next. The Have Disk button should then appear.)
  5. In the “Install from Disk” dialog, click the Browse button.
  6. Use this window to navigate to the following folder: C:Program FilesCommon FilesAppleMobile Device SupportDrivers.
  7. Double-click the “usbaapl” file. (This file will be called “usbaapl64” if you have a 64-bit version of Windows. If you don’t see “usbaapl64” here, or if there is no Drivers folder, look in C:Program Files (x86)Common FilesAppleMobile Device SupportDrivers. instead).
  8. Click OK in the “Install from Disk” dialog.
  9. Click Next and finish the driver-installation steps. Open iTunes to verify that the device is recognized properly.

This worked – as soon as I clicked “next”, the iPhone’s screen lit up and it started synchronizing.

This was on Windows 7 64bit, do check the article for other versions and more detailed descriptions.